Ten ways to reduce the cost of Google Cloud Compute Engine

Maciej Strzelczyk, Developer Programs Engineer, Google Cloud Platform
Source: cloud.google.com/blog/…, cloud.google.com/blog/…
A Penny Saved Is a Penny Earned!
Google Cloud Compute Engine offers various ways to reduce costs, from optimizing your infrastructure to leveraging discounts. This post outlines 10 practical Google Cloud cost optimization tips to help you save money on Google Compute Engine. Whether you are a small business just starting with the cloud or a large enterprise looking to optimize expenses, this guide has something for everyone.
1. Review Your Current Cost Structure
Before looking for ways to optimize your Google Compute Engine budget, it helps to have a map—a clear understanding of your current situation and cost structure—so you can make informed decisions on what to do next. The Billing Dashboard in the Google Cloud Console is your map. It tells you exactly where your money is going, with every penny tracked down to individual SKU (Stock Keeping Unit) entities. You can use it to see your organization’s overall financial picture and analyze costs for specific product usage within a project.
A closer look at your expenses may help you identify resources you no longer need but are still paying for. After all, the best way to save money is simply not to spend it.
2. Consider Automatic Recommendations
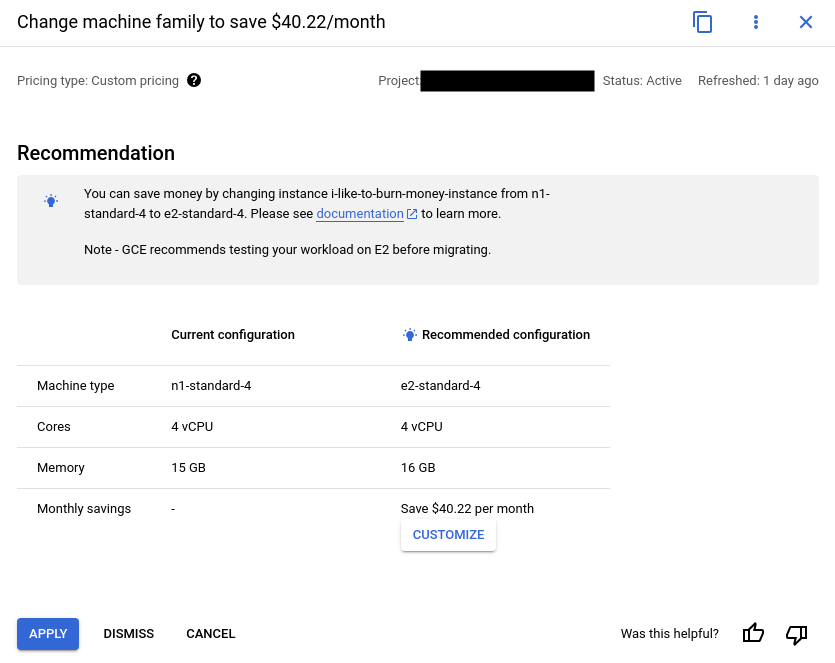
Have you noticed light bulbs next to some of your machines on your virtual machine list page? These are automatic Google Cloud cost optimization recommendations that you can review to save money. These helpful tips come from the Recommendation Hub, a tool designed to help you manage your project in categories such as cost, security, performance, reliability, manageability, and sustainability. The recommendation system has insights into your resource structure and can suggest actions for you to consider. The goal here is to help you reduce costs without compromising performance.
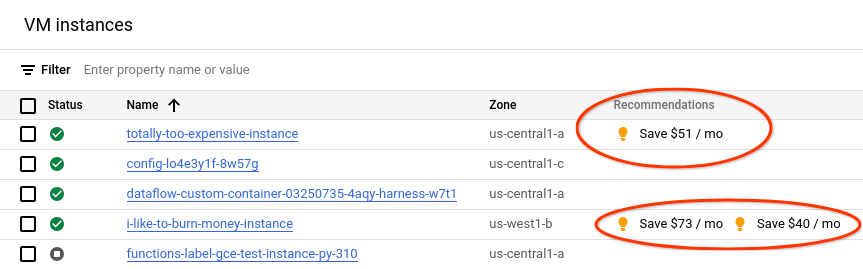
The system may suggest actions like changing a machine type (e.g., from n1 to e2), downsizing a machine based on its usage, and more. Once you click on a recommendation, you’ll see a summary of the suggested change along with an estimated cost savings calculation. You can choose whether to apply the changes. Remember that computation changes require restarting the instance.
3. Check Your Disk Types
Every virtual machine in your fleet must have at least one persistent disk attached. Disks in Google Cloud come in different types, offering varying performance and features. Available types include:
- Hyperdisk. Designed for the most demanding mission-critical applications, Hyperdisk offers scalable, high-performance storage with a comprehensive set of data storage and management features.
- Hyperdisk Storage Pools—pre-allocated storage capacity, bandwidth, and IOPS you can allocate to applications as needed.
- Persistent Disk—the default storage solution for virtual machines, available in zonal or regional variants. Comes in four options:
- Standard – equivalent to an HDD, providing the lowest-cost storage at the expense of lower I/O speed.
- SSD – a high-speed solution offering high I/O performance at a higher cost per GB.
- Balanced – the middle ground between Standard and SSD; the default option for new compute instances.
- Extreme – for the most demanding workloads, allowing you to control both disk size and IOPS (I/O operations per second).
- Local SSD—a physically attached SSD that provides ultra-fast speeds but is not persistent.
Let’s focus on the Persistent Disk family, as it is the most commonly used storage solution. When creating a new virtual machine, the default disk type is Balanced, which provides a good mix of performance and cost. While suitable for many use cases, it may not be the best option for every application. For instance, stateless applications that are part of auto-scaling deployments and store all relevant data in an external cache or database do not require high disk I/O. These applications are great candidates for switching to Standard disk, which can be up to three times cheaper per GB than a Balanced disk (depending on the region).
You can list the disks used in your project with the command:
gcloud compute disks list --format="table(name, type, zone, sizeGb, users)"
To change the disk type, you will need to clone it and update the virtual machines using it to start utilizing the new disk.
4. Free Up Space on Your Disks
Continuing with storage, the disk type is not the only factor affecting costs. Disk usage can also play a significant role in your budget. If your project has a persistent 100GB disk, you are paying for 100GB, regardless of whether you are using 20%, 70%, or 100% of that space. Even if your application does not use persistent disks for storing data, you should still pay close attention to your boot disks. Consider whether your stateless application truly needs a disk with several gigabytes of free space, then think about resizing these disks according to actual usage. People like round numbers, and they often create 20GB disks when they only need 12GB. Be more like a machine—save money.
5. Commit to Using Committed Use Discounts (CUD)
This advice applies to many products beyond Google Compute Engine. If you know you will be using a certain number of virtual machines for at least a year (or three years), you can secure a solid discount! By leveraging various CUDs, you can purchase significantly lower prices on vCPUs, memory, GPUs, local SSDs, sole-tenant nodes, and software licenses. With Flex CUD, you don’t even have to restrict vCPU and memory usage to a single project, region, or machine series.
Many Google Cloud products offer committed use discounts. If you are satisfied with Google Cloud and do not plan to leave soon, strongly consider using CUDs wherever possible to achieve significant savings. For compute resources, you can purchase CUDs directly from the Google Cloud Console.
6. Get Rid of External IP Addresses
By default, Compute instances created via gcloud or the Google Cloud Console have an ephemeral external IP address. Sometimes, this is exactly what you need to set up a quick prototype or host a single VM instance for a specific service using dynamic DNS. However, if you are using virtual machines with a load balancer, ask yourself whether they still need an external IP address. After all, clients interact with your services through the public IP of the load balancer. On the other hand, having internet access can be highly useful, such as communicating with third-party services. By default, a virtual machine without an external IP cannot connect to the internet.
Fortunately, Cloud NAT solves this issue with a Public NAT configuration. Cloud NAT does the same thing that many internet service providers do for their customers: it provides network address translation, hiding multiple machines behind a single external IP address. From the outside, all requests appear to come from one IP address, while in reality, they are sent by multiple different machines. A side note: this also works for GKE.
If your fleet consists of only a couple of virtual machines, you may not notice a huge difference in your monthly bill by turning off external IP addresses. However, the savings grow linearly with the size of your fleet. Additionally, there are two more advantages to using Cloud NAT: you improve security (your virtual machines are not exposed to the internet), and you do not consume IP address quotas in your project.
7. Automate Machine Start and Stop
Cron (a Unix task scheduling utility) is the foundation of many automated batch processing systems. It allows you to schedule actions on a regular pattern without manually initiating them. Virtual machines configured with cron wait for the right time to start a resource-intensive task. For a few hours, the machine is very busy, but once the job is complete, the VM just sits idle, waiting for the cron job to trigger again. In other words, for a few hours, the VM generates value for your company, and the rest of the day, it generates costs. Wouldn’t it be great if you could eliminate some of the overhead costs? Turns out, you can—sort of.
A virtual machine incurs costs when it consumes resources such as vCPU, memory, disks, accelerators (GPU and TPU), or external IP addresses. When powered on, it uses all these resources, but when powered off, the only cost category it generates is related to storage (assuming you are not using a static external IP). Naturally, an unused computer is turned off (to save power and protect the planet). Unfortunately, a powered-off machine cannot run cron jobs unless… you use a cron-like system to start the machine instead!
What do I mean? It turns out you can create a cron-like schedule in your project to start your machine. Then, you only need to set up a cron-based process for automatic startup when the machine boots, and then…! You get the same functionality (nightly data collection and processing) without spending money to keep the virtual machine running when you don’t need it. Once your nightly process is complete, the machine can shut down from within and remain in that state until it is needed again.
8. Consider Using Spot VMs
Spot VMs are a type of preemptible instance that can save you significant costs (they are 90% cheaper than standard virtual machines). Unlike regular virtual machines that run continuously, Spot VMs use idle resources in Google Cloud and may be terminated if Google needs them back. This means that if Google needs to reclaim resources, your Spot VM will be stopped with a 30-second warning.
But don’t let that scare you! Spot VMs are perfect for batch processing, stateless workloads, and other tasks that can tolerate interruptions. And since they are significantly cheaper than standard virtual machines, you can save a lot on cloud computing costs.
One of the best benefits of Spot VMs is that you can use them just like regular VMs. You can create them with the same tools and APIs, and they can run the same operating systems and applications. The only difference is that you pay less for them (and they can be turned off with a short warning). Switching your stateless managed instance group or Google Kubernetes Engine (GKE) instances to Spot VMs is almost seamless since these two systems simply recreate the instances allocated to you.
9. Compare Regions to Find the Best Deal
Hosting your software on Google Cloud has many advantages, one of which is the freedom to choose the physical location of the machines running your services. Your location choice may be influenced by factors such as compliance with local laws, feature availability, and proximity to your user base (and service latency).
Another factor is pricing. By checking the Compute pricing page, you can easily compare how much the products you use cost in different regions. In some cases, when latency or data sovereignty is not a key concern, choosing a more cost-effective region makes sense, especially when regions with different pricing are close to each other. To help you pick the ideal regions, we also have the Google Cloud Region Picker tool to balance all these variables.
10. Implement Automatic Time Limits
If you tend to forget about your virtual machines, there’s a new feature that can help you save money: the ability to set a runtime limit after which your virtual machines will shut down or be deleted.
Currently in preview, this feature can be useful in various scenarios. Imagine:
- You have a long-running operation. If it runs for a certain number of hours, you can configure the VM to stop automatically after that time, avoiding unnecessary costs and allowing you to return and debug rather than leaving it running indefinitely.
- Your team needs to run experiments. You can set up temporary VMs that automatically stop after a specific time, ensuring that no one has to remember to shut them down manually.
- Peak usage periods. If you need extra compute power for a limited time (e.g., during Christmas), you can create VMs that will automatically be deleted on a set date, freeing up resources.
The more you think about it, the more use cases you’ll find for this feature. You may not always need it, but it’s worth keeping in mind when setting up your daily infrastructure operations.
Conclusion
We covered a lot of ground and explored many strategies within Google Cloud cost optimization. From fine-tuning disk size, leveraging committed use discounts, and exploring Cloud NAT to scheduling instances and using Spot VMs—there’s no shortage of ways to save.
Remember, keeping track of your cloud expenses is like managing personal finances: every penny counts! So take the time to explore these strategies and make the most of your cloud investment.
May your projects be successful and your cloud bills manageable. Happy optimizing!
Wise IT — Google Cloud Partner of the Year in the Services CEE category! If you’re interested in migrating to Google Cloud or optimizing your existing infrastructure, contact our experts for prompt and competent support:


